Showing posts with label dessert. Show all posts

Monday, April 25, 2011

5 minute food processor Ice Cream or Frozen Yogurt or Sorbet

Not my photo, but the ice cream is as yummy as this looks :-)


This one seriously only takes 5 minutes.  It's soft serve ice cream, and the flavor possibilities are endless.


Easy 1-2-3

10-12 ounces frozen fruit (I really just measure about two cups)
1/2 cup sugar
2/3 cup heavy cream or yogurt or fruit juice

1 - Combine fruit and sugar in food processor for about 30 seconds.  Until you can't tell one from the other.  Few or no chunks.
2- Add cream/yogurt/juice until you've reached desired consistency.  Start with 1/2 cup, and then add more if needed.
3 - Serve and Enjoy.

Tips: Don't try to change the order of instructions.  If you add the fruit after the cream/yogurt, it won't chop up very finely and might leave chunks larger than you want.

You can use a regular blender for this, but it will likely take a little more time.  If you use a blender, you will want to add the fruit a little bit at a time, and layer it with the cream/yogurt/juice as it goes in.

If you want a thicker freeze, add a little more fruit at the beginning.  15 ounces of fruit makes a nice thick ice cream.

If you want a scoop-able ice cream for later, freeze the soft serve for an hour or more.  It will scoop up just like normal and even go into a cone for optimal kinder enjoyment.

Flavor combo suggestions:
Peach and raspberry
Mango and Lime (freeze peeled lime wedges ahead of time)
Mixed berry
Strawberry
Strawberry peach
Pineapple Banana

Seriously, make some right now.  You'll thank yourself.

Monday, May 24, 2010

Baklava

Around my eighteenth birthday, I took a trip with my parents to Greece.  We spent about two weeks traveling through Athens and the nearby islands.  It was wonderful!  One of my favorite things was eating massive amounts of pastry and a dessert called baklava.

If you've read my blog much, you know that I don't approve of baking nuts into dessert.  This is my one exception.  You can't make Baklava without nuts, and you wouldn't want it any other way.

It's a layered dessert, and it's as simple to assemble as lasagna.  I used this recipe.


Ingredients

  • 1 (16 ounce) package phyllo dough
  • 1 pound chopped nuts
  • 1 cup butter
  • 1 teaspoon ground cinnamon
  • 1 cup water
  • 1 cup white sugar
  • 1 teaspoon vanilla extract
  • 1/2 cup honey

Directions

  1. Preheat oven to 350 degrees F(175 degrees C). Butter the bottoms and sides of a 9x13 inch pan.
  2. Chop nuts and toss with cinnamon. Set aside. Unroll phyllo dough. Cut whole stack in half to fit pan. Cover phyllo with a dampened cloth to keep from drying out as you work. Place two sheets of dough in pan, butter thoroughly. Repeat until you have 8 sheets layered. Sprinkle 2 - 3 tablespoons of nut mixture on top. Top with two sheets of dough, butter, nuts, layering as you go. The top layer should be about 6 - 8 sheets deep.
  3. Using a sharp knife cut into diamond or square shapes all the way to the bottom of the pan. You may cut into 4 long rows the make diagonal cuts. Bake for about 50 minutes until baklava is golden and crisp.

  4. Make sauce while baklava is baking (Remember, I made this ahead, and used it cold.) Boil sugar and water until sugar is melted. Add vanilla and honey. Simmer for about 20 minutes.
  5. Remove baklava from oven and immediately spoon sauce over it. Let cool. Serve in cupcake papers. This freezes well. Leave it uncovered as it gets soggy if it is wrapped up.

There's really no point in copying the nutritional information, it's sad and depressing to look at the calories of such a beautiful dish.

I followed the directions almost exactly, because I'd never made it before.  I did however take three days to make it.  I'll explain.

First, I chopped the nuts in my food processor.  I used the nuts I had in my cupboards.  Peanuts, Candied Cashews, and Almonds.  Then I realized I hadn't thawed my frozen phyllo dough, and left the nuts on the counter until the next day.  Then I put the dough in the fridge to thaw.

Then next day, I prepared the honey sauce.  Then, because some of the All Recipes reviewers suggested using a cooled sauce, I put that in the fridge and waited until the next afternoon to assemble to whole thing.  I also took another reviewers suggestion and roasted the nuts with the cinnamon.  Do that.  

I tried a piece directly after the honey shower while it was still warm, and it was not nearly as good as the cooled version a few hours later.

Hubby didn't like nuts, even in this.  He's might be culinarily challenged.  It made about 30 large pieces. I could have halved each one again.  I froze all but two plates (ten pieces), one of which I am not ashamed to admit I ate.  The other went to a friend.  I took another two plates from the freezer later that week and served them at a church meeting.  Another went to someone's birthday party.  A hit every time!

Wednesday, May 5, 2010

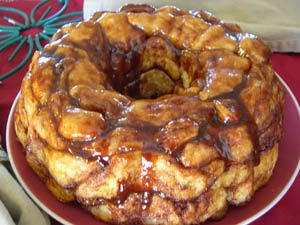
Pillsbury Cinnamon Monkey Bread

The original recipe is here.


I changed it by leaving out the Hubby hated walnuts, and using Pillsbury cinnamon rolls instead of Grand's biscuits.  Instead of adding the cinnamon sugar coating in a bag, we stirred it in a large bowl.  I think that was easier. Then when it was done, we used the icing that came with the cinnamon rolls over the top.

I also added 1/4 cup of raisins.  We don't believe in adding nuts to baked goods around here, but for those of you who would do something so ridiculous, an additional 1/4 of chopped nuts would probably be nice too.

It was devilishly delicious!

Try it.  It's so easy and totally worth it.  Plus your house will smell good all day.

You could prepare it in the evening and then pop it in the oven in the morning for  quick breakfast treat before church or something.

Sunday, January 10, 2010

Three Layer Chocolate Cake

I wanted to make a boxed cake that I bought at Safeway.  Dark Chocolate Mint Cake.  Then hubby asked "could it be made with milk chocolate, instead of dark?"  So I tried to come up with my own, saving the box for a time when I was alone and could enjoy it's decadence by myself.

I used the measurements for liquid on the box, then substituted with a chocolate cake mix from my cupboard (when Target has cake mixes for $.79 I can't help myself.)  Spread onto parchment paper in jellyroll pan, and bake 15 min.  It wasn't very even.  The liquid was less than the box called for, and therefore the mixture was very thick.  Hard to spread evenly.

Still, I cut into three bricks, the short length of the pan, and cooled.  I made chocolate icing from my Hershey cookbook and topped with Andes Mint pieces.  Yum!

Once again, I couldn't get to my camera before hubby took a test bite (or three.)


What to change:
1. More careful about spreading mix evenly before baking.  Would have laid out more nicely.
2. Just use the box, it came with everything, and hubby really wouldn't have noticed
3. Keep camera handy so he can't bite into the corner before I get a good picture

Thursday, November 12, 2009

Ah Fudge! - Even I can't mess this one up

So my favorite recipe website, All Recipes, had this recipe on their front page yesterday. It's from Eagle Brand and because it looked so easy, I decided to try it.

Lil' Chefs helped and it was Soooooo easy! Plus, it tasted really good and gets me started off well on my holiday 5-15 lb. tradition.


Cookies 'n' Creme Fudge:

18 oz. white chocolate peices, or baking squares
1 can (14 oz.) Sweetened Condensed Milk
3 cups coarsely crushed chocolate sandwich cookies
1/8 tsp. salt

1. In heavy saucepan, melt chocolate, milk, and salt over low heat
2. Stir in crushed cookies
3. Pour into wax paper lined pan (9x13 or 8x8)
4. Refrigerate for 2 hours.
5. Turn on to cutting board and remove paper. Cut into 1 inch squares. Store covered in fridge.

By - Eagle Brand


Questions to experiment with:
1. Would this work as well with milk chocolate?
2. How much can I make before my family and I are sick of it?
3. What other fillings would go well here?

What I learned was that making impressive desserts doesn't have to be hard. Lil' Chef actually did most of the stirring, and that was the hardest part. Lil' other Chef did more of the cookie smashing, which is more in line with her personality. Lil'st chef kept watch from his perch in the Bjorn.

I think next time I will try using some kind of jam or fruit. Maybe raspberries or cranberries in the holiday spirit. That would be pretty. The cookies I used were the Christmas ones (which are out a little early this year, if anybody cares what I think.) so they had red filling. The whole fudge ended up being pink which delighted Lil' chef's to no end.

Now I have something super easy and quick to give to friends for the Holiday's and they'll be impressed with my craftiness and holiday spirit. Maybe they'll all want to be just like me!